Add the reference of the Microsoft Excel Object 12 reference into your project
then add the following code
Microsoft.Office.Interop.Excel.Application xla = new Microsoft.Office.Interop.Excel.Application();
xla.Visible = true;
Microsoft.Office.Interop.Excel.Workbook wb = xla.Workbooks.Add(Microsoft.Office.Interop.Excel.XlSheetType.xlWorksheet);
Microsoft.Office.Interop.Excel.Worksheet ws = (Microsoft.Office.Interop.Excel.Worksheet)xla.ActiveSheet;
int i = 1;
int j = 1;
foreach (ListViewItem comp in listView1.Items)
{
ws.Cells[i, j] = comp.Text.ToString();
//MessageBox.Show(comp.Text.ToString());
foreach (ListViewItem.ListViewSubItem drv in comp.SubItems)
{
ws.Cells[i, j] = drv.Text.ToString();
j++;
}
j = 1;
i++;
}
Friday, July 16, 2010
Friday, May 14, 2010
How To Call DLL Created in .Net From VBA Application
The Following steps are .....
1)First created one Class Library in .net.Writes all the function and methods which are required.
2)For Register DLL for COM INTROP we have to open Solution Explorer of Current project.
3)Select project node then select properties window.
4)Choose Configaration properties then child node with Build tab.
5)In Build tab there is check box for Register For COM Introp ,Check it.
6)Now Compile the DLL/Class Library it is register for COM Introp.
7)Now we can acess this DLL in VBA by simply add Reference of that DLL .
Hope your DLL or Class Library can build from .net to VBA................
Enjoy Code
Tuesday, December 29, 2009
Generates Crystal Report without using dataset in ASP.net
Here I m giving you a sample code for generating crystal report without using dataset.Do the following steps for generating report.....
1)Create Web form name as Default.aspx
Drag and drop button control on that form.
Write the following code on Default.aspx.cs
SqlConnection con = new SqlConnection("server=.;integrated security=true;database=WIFI");
SqlCommand com = new SqlCommand();
SqlDataReader dr;
protected void Button1_Click(object sender, EventArgs e)
{
com.CommandText = " Write the quary what u want to display on crystal report";
com.Connection = con;
con.Open();
dr = com.ExecuteReader();
dr.Close();
con.Close();
Response.Redirect("Default2.aspx");
}
2)Create second Web form named as Default2.aspx
Drag and drop CrystalReportViewer control on that
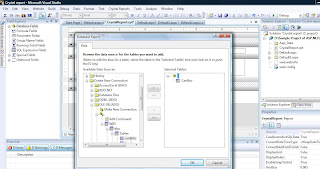
3)Then add Crystal Report from Add New Item named as CrystalReport.rpt
In Field Explrer add Database field
Right Click on Database field and select Database Expert
Then Select new Connection and make connection with OLEDB(ADO),With specify server and database name for proper connetion
4)Write the code on Default2.aspx.cs
using CrystalDecisions.CrystalReports.Engine;
using CrystalDecisions.Shared;
protected void Page_Load(object sender, EventArgs e)
{
ReportDocument rd = new ReportDocument();
TableLogOnInfos tblinfos = new TableLogOnInfos();
TableLogOnInfo tblinfo = new TableLogOnInfo();
ConnectionInfo cn = new ConnectionInfo();
Tables tab;
cn.ServerName = ".";
cn.DatabaseName = "WIFI";
cn.IntegratedSecurity = true;
rd.Load(Server.MapPath("CrystalReport.rpt"));
tab = rd.Database.Tables;
foreach (CrystalDecisions.CrystalReports.Engine.Table crtab in tab)
{
tblinfo = crtab.LogOnInfo;
tblinfo.ConnectionInfo = cn;
crtab.ApplyLogOnInfo(tblinfo);
}
CrystalReportViewer1.HasDrillUpButton = false;
CrystalReportViewer1.HasExportButton = true;
CrystalReportViewer1.HasGotoPageButton = false;
CrystalReportViewer1.HasPageNavigationButtons = true;
CrystalReportViewer1.HasPrintButton = true;
CrystalReportViewer1.HasRefreshButton = true;
CrystalReportViewer1.HasSearchButton = false;
CrystalReportViewer1.HasToggleGroupTreeButton = false;
CrystalReportViewer1.DisplayGroupTree = false;
CrystalReportViewer1.HasViewList = false;
CrystalReportViewer1.HasZoomFactorList = false;
CrystalReportViewer1.HasCrystalLogo = false;
CrystalReportViewer1.ReportSource = rd;
CrystalReportViewer1.DataBind();
}
1)Create Web form name as Default.aspx
Drag and drop button control on that form.

Write the following code on Default.aspx.cs
SqlConnection con = new SqlConnection("server=.;integrated security=true;database=WIFI");
SqlCommand com = new SqlCommand();
SqlDataReader dr;
protected void Button1_Click(object sender, EventArgs e)
{
com.CommandText = " Write the quary what u want to display on crystal report";
com.Connection = con;
con.Open();
dr = com.ExecuteReader();
dr.Close();
con.Close();
Response.Redirect("Default2.aspx");
}
2)Create second Web form named as Default2.aspx
Drag and drop CrystalReportViewer control on that

3)Then add Crystal Report from Add New Item named as CrystalReport.rpt
In Field Explrer add Database field
Right Click on Database field and select Database Expert
Then Select new Connection and make connection with OLEDB(ADO),With specify server and database name for proper connetion

4)Write the code on Default2.aspx.cs
using CrystalDecisions.CrystalReports.Engine;
using CrystalDecisions.Shared;
protected void Page_Load(object sender, EventArgs e)
{
ReportDocument rd = new ReportDocument();
TableLogOnInfos tblinfos = new TableLogOnInfos();
TableLogOnInfo tblinfo = new TableLogOnInfo();
ConnectionInfo cn = new ConnectionInfo();
Tables tab;
cn.ServerName = ".";
cn.DatabaseName = "WIFI";
cn.IntegratedSecurity = true;
rd.Load(Server.MapPath("CrystalReport.rpt"));
tab = rd.Database.Tables;
foreach (CrystalDecisions.CrystalReports.Engine.Table crtab in tab)
{
tblinfo = crtab.LogOnInfo;
tblinfo.ConnectionInfo = cn;
crtab.ApplyLogOnInfo(tblinfo);
}
CrystalReportViewer1.HasDrillUpButton = false;
CrystalReportViewer1.HasExportButton = true;
CrystalReportViewer1.HasGotoPageButton = false;
CrystalReportViewer1.HasPageNavigationButtons = true;
CrystalReportViewer1.HasPrintButton = true;
CrystalReportViewer1.HasRefreshButton = true;
CrystalReportViewer1.HasSearchButton = false;
CrystalReportViewer1.HasToggleGroupTreeButton = false;
CrystalReportViewer1.DisplayGroupTree = false;
CrystalReportViewer1.HasViewList = false;
CrystalReportViewer1.HasZoomFactorList = false;
CrystalReportViewer1.HasCrystalLogo = false;
CrystalReportViewer1.ReportSource = rd;
CrystalReportViewer1.DataBind();
}
Storing Images in Database Table by using SQL
You can easily store images in database table do the following steps.......
*First create myTable using this quary
CREATE TABLE myTable(Document varbinary(max))
*After that insert images into following table
INSERT INTO myTable
SELECT bulkcolumn FROM OPENROWSET
(BULK 'C:\cute-baby-5909.jpg', SINGLE_BLOB) as blob
here the images are store in varbinary formate this is backend procedure for storing images.....
Hope so your image is stored in table
Thursday, December 17, 2009
How to published your websites in IIS server in window vista operating system
First Build your website and run on local system,after succesfully build do the following steps for publish our websides.....
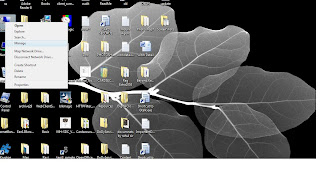
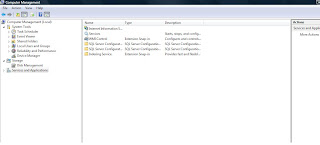
1)Right Click on Computer and select Manage from contextmenu strip. then Computer Managment screen will appear.
2)Then select services and Application from list,u wil see Internate Information Services(IIS)Manager as subclass and select it.
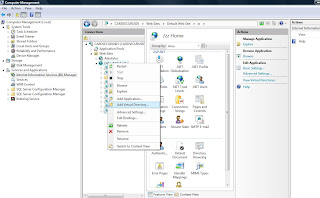
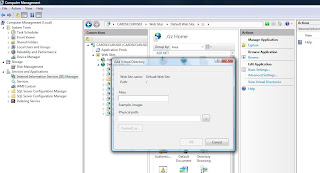
3)you wil appear Screen of IIS then click on Connection Right click on Default Web site and Add virtual Directory.
4)Alias Name and Physical path of our website is given.
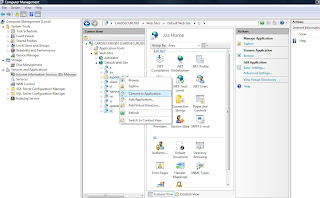
5)Then you see the Virtual directory folder on your Default Websites List.
6)After that Right Click on Virtual Directory Folder(with alias name you are provided to your websites as soon ) and Convert to application and click OK.
7)Then you see your virtual diectory is converted into application in your Default Web Sites Folder then Right Click on your Application and Browse it.
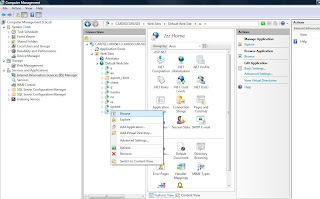
8)Now your Websites Run through IIS
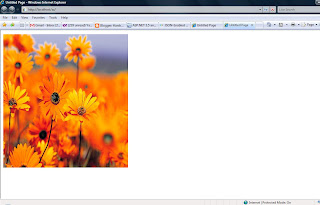
9)You can also check by entering IP Address of your system and call websites through addressbar like
http://192.168.22.112//Websites

Note: Make sure your Windows Firewall is off ,if not then please turn off.
Hope so your enjoying these steps and your Website also published..........
1)Right Click on Computer and select Manage from contextmenu strip. then Computer Managment screen will appear.

2)Then select services and Application from list,u wil see Internate Information Services(IIS)Manager as subclass and select it.

3)you wil appear Screen of IIS then click on Connection Right click on Default Web site and Add virtual Directory.

4)Alias Name and Physical path of our website is given.

5)Then you see the Virtual directory folder on your Default Websites List.
6)After that Right Click on Virtual Directory Folder(with alias name you are provided to your websites as soon ) and Convert to application and click OK.

7)Then you see your virtual diectory is converted into application in your Default Web Sites Folder then Right Click on your Application and Browse it.

8)Now your Websites Run through IIS

9)You can also check by entering IP Address of your system and call websites through addressbar like
http://192.168.22.112//Websites

Note: Make sure your Windows Firewall is off ,if not then please turn off.
Hope so your enjoying these steps and your Website also published..........
Saturday, December 5, 2009
Data Type in C#.net
| Data Type | Description | Example |
| object | The base type of all types | object obj = null; |
| string | String type - sequence of Unicode characters | string str = "Harsha"; |
| sbyte | 8-bit signed integral type | sbyte val = 15; |
| short | 16-bit signed integral type | short val = 15; |
| int | 32-bit signed integral type | int val = 15; |
| long | 64-bit signed integral type | long val1 = 15; long val2 = 34L; |
| bool | Boolean type; a bool value is either true or false | bool val1 = true;bool val2 = false; |
| char | Character type; a char value is a Unicode character | char val = 'h'; |
| byte | 8-bit unsigned integral type | byte val1 = 15; byte val2 = 34U; |
| ushort | 16-bit unsigned integral type | ushort val1 = 15; ushort val2 = 34U; |
| uint | 32-bit unsigned integral type | uint val1 = 15; uint val2 = 34U; |
| ulong | 64-bit unsigned integral type | ulong val1 = 15; ulong val2 = 34U; ulong val3 = 56L; ulong val4 =78UL; |
| float | Single-precision floating point type | float val = 1.23F; |
| double | Double-precision floating point type | double val1 = 1.23; double val2 = 4.56D; |
| decimal | Precise decimal type with 28 significant digits | decimal val= 1.23M; |
Types in C#
C# supports two kinds of types: value types and reference types.
| Type | Description |
| Value Types | Includes simple data types such as int, char, bool, enums |
| Reference Types | Includes object, class, interface, delegate, and array types |
Value Types- Value type objects direct contain the actual data in a variables. With value types, the variables each have their own copy of the data, and it is not possible for operations on one to affect the other.
int i = 10;
Reference Types- Reference type variables stores the reference of the actual data. With reference types, it is possible for two variables to reference the same object, and thus possible for operations on one variable to affect the object referenced by the other variable.
MyClass cls1 = new MyClass();
Data Type Conversions
C# supports two types of conversions. Implicit conversions and explicit conversions.
Implicit conversions are direct conversion. For example:
int iVal = 34;
long lVal = intValue;
Explicit conversions includes type casting. conversion. For example:
long lVal = 123456;
int iVal = (int) lVal;
Friday, December 4, 2009
Shortcut Keys
| Ctrl-X or Shift-Delete | Cuts the currently selected item to the clipboard |
| Ctrl-C or Ctrl-Insert | Copies the currently selected item to the clipboard |
| Ctrl-V or Shift-Insert | Pastes the item in the clipboard at the cursor |
| Ctrl-Z or Alt-Backspace | Undo previous editing action |
| Ctrl-Y or Ctrl-Shift-Z | Redo the previous undo action |
| Ctrl-Shift-V or Ctrl-Shift-Insert | Pastes an item from the clipboard ring tab of the Toolbox at the cursor in the file and automatically selects the pasted item. Cycle through the items on the clipboard by pressing the shortcut keys repeatedly |
| Esc | Closes a menu or dialog, cancels an operation in progress, or places focus in the current document window |
| Ctrl-S | Saves the selected files in the current project (usually the file that is being edited) |
| Ctrl-P | Displays the Print dialog |
| F7 | Switches from the design view to the code view in the editor |
| Shift-F7 | Switches from the code view to the design view in the editor |
| F8 | Moves the cursor to the next item, for example in the TaskList window or Find Results window |
| Shift-F8 | Moves the cursor to the previous item, for example in the TaskList window or Find Results window |
| Shift-F12 | Finds a reference to the selected item or the item under the cursor |
| Ctrl-Shift-G | Opens the file whose name is under the cursor or is currently selected |
| Ctrl-/ | Switches focus to the Find/Command box on the Standard toolbar |
| Ctrl-Shift-F12 | Moves to the next task in the TaskList window |
| Ctrl-Shift-8 | Moves backward in the browse history. Available in the object browser or Class View window |
| Alt-Left Arrow | Go back in the web browser history |
| Alt-Right Arrow | Go forward in the web browser history |
Project related Shortcut keys
| Ctrl-Shift-B | Builds thesolution |
| Ctrl-N | Displays the New File dialog. Note: files created this way are not associated with a project. Use Ctrl-Shift-A to add a new file in a project |
| Ctrl-Shift-N | Displays the New Project dialog |
| Ctrl-O | Displays the Open File dialog |
| Ctrl-Shift-O | Displays the Open Project dialog |
| Shift-Alt-A | Displays the Add Existing Item dialog |
| Ctrl-Shift-A | Displays the Add New Item dialog |
| Ctrl-Alt-Insert | Allows you to override base class methods in a derived class when an overridable method is highlighted in the Class View pane |
Subscribe to:
Posts (Atom)
